


How to use Filters in Sage 100 ERP

Whether you are looking up a vendor, customer, invoice, sales order or inventory item within Sage 100 ERP, setting up filters is a great resource. It’s always nice to have a tool that can allow you to streamline steps and save a little bit of time. Who doesn’t like to save time? Below I will show you how to set up a filter within the A/R module. Once you learn how to set up a filter, you can use these same steps in other modules as well. It’s easy as E-R-P!
Customer Inquiry Filter Set Up
1. Select the Accounts Receivable module and click on the “main” folder
2. Within the “main” folder, select Customer Inquiry
Note: Filters can be set up in Inquiry or Maintenance. A best practice is to always use Inquiry, because information cannot be changed or deleted as it can be in Maintenance.
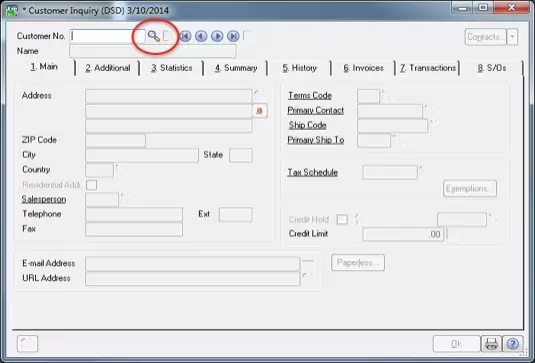
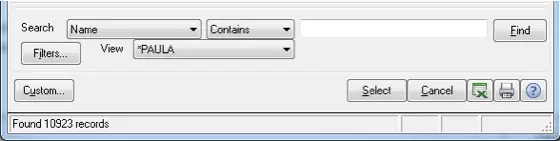
3. Then select the magnifying glass. A customer list will generate and within that box is a field to search for the customer name.
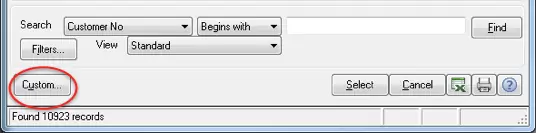
4. To start click the Custom button, located on the bottom left hand side.
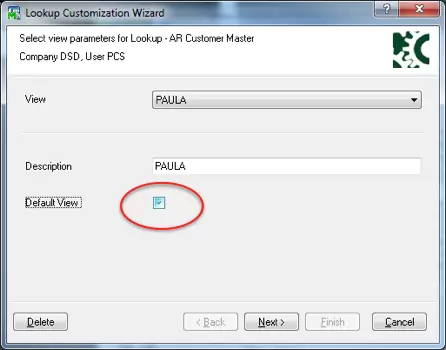
5. Once you select the custom button, the lookup customization wizard will appear. Select “create a new view” under the view section and then give it a name.
6. Select the Default View button underneath the description. This will create the default view, every time you login.
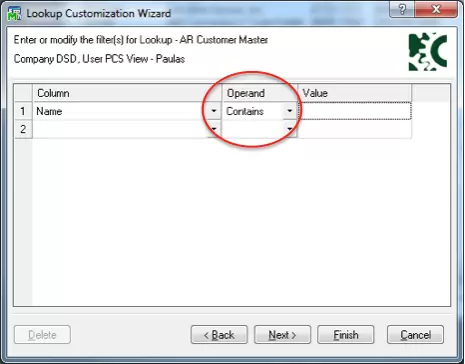
7. Select the Next button and then proceed with your customized filter. I set my filter up so that it always has “contains” in the search field, with the customer name. As you can see from the options, you can set up the filter however you like. It all depends on your daily searching inquiries. For example, if I need to search by state, I can create another filter for this and toggle between the different filters under “view”.
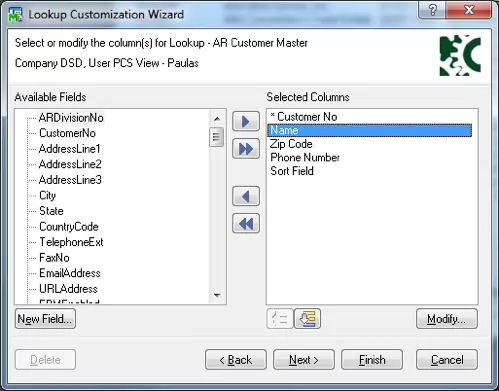
8. Click Next and proceed. You will then tell the filter how to operate.
9. Click the Next button and proceed. Here you will customize the initial display for your view. Input a title, choose the default column to search and the default search option.
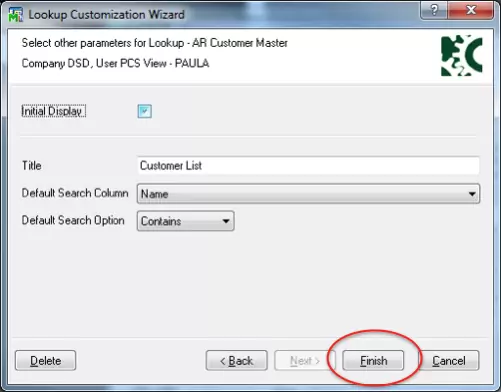
10. Click Finish and the filter will now automatically generate your default view filter.
There are many ways you can set up filters with different parameters. Each module has the filters option to customize views. I hope you have found this tip to be useful in your daily Sage 100 ERP tasks.
Happy Filtering!
Written by Paula Smith, Services Coordinator at DSD Business Systems