


Oops! I Merged Too Many Accounts! – Where’s The Undo Button!

April 12, 2016

This blog will guide you through avoiding the pitfalls of merging the wrong accounts.
A few years ago, I took a support call from a client who exclaimed “I just used the Sage 100 Vendor Delete/Renumber/Merge Utility and merged 60,000 vendor records into one! Where’s the UNDO Button?” I said “There is no UNDO Button. Where is your backup?” Unfortunately, his backup was four months old!
The Sage 100 Delete and Change Utilities (for Customers, Vendors and Inventory Items) do not have an UNDO button. Once the delete or merge process is completed, the changes are permanent, and there is no process to reverse the changed records.
Sage Software modified the Delete/Renumber/Merge utilities (for Customers, Vendors and Items) with the Business Framework versions (renamed Delete and Change Customers/Vendors/Items), making it more difficult to inadvertently merge an incorrect range of selected accounts by mistake. But, occasionally, this still occurs.
The Merge utility is the most prone to cause problems merging unintended accounts. I haven’t had a support call regarding the Delete or Change utility. Special care should be taken whenever the Merge utility is used for merging duplicate customer, vendor or inventory item accounts into a single account.
The Merge utility data entry panel uses a Starting and Ending account number. If the starting and ending account numbers are different, every account number within that range will be selected. For example, if ‘Starting’ = 1 and ‘Ending’ = 5, the change will merge items 1,2,3,4 and 5 into the ‘New’ account. Therefore it is important to verify the starting and ending accounts before clicking the Proceed button.
Here are my recommended steps for using the Merge feature of Delete and Change accounts:
Sage 100 Version 4.40+ (Business Framework modules):
- Verify you have a current system backup (on tape or other media).
- Or, use Company Maintenance, creating a backup within Sage 100. In Company Maintenance, create a new company such as BAK. Next, use the COPY button and copy your live company data (Source Company) to BAK (Destination Company).
- Run the “Delete and Change Customers” from the module’s Utilities menu. A similar utility is used to delete or merge Inventory Items and Vendors.
- Print and Review the Delete or Change Report to verify the action the utility will perform.
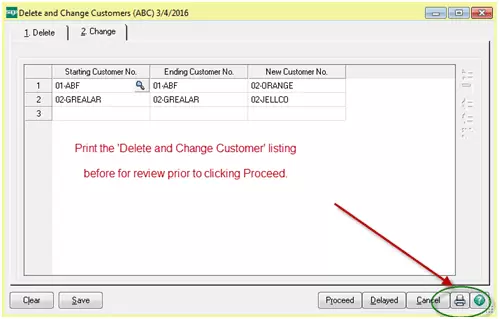
Sample Delete and Change listing

- After the Merge is completed, verify the results by looking at changes that were made.
- If the results are wrong, you can restore the original files using Company Maintenance to copy company code BAK (Source) back to your live company code (Destination).
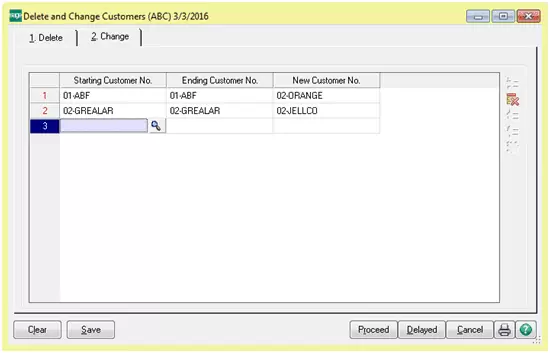
Here is an example, using Sage 100 Accounts Receivable 5.20 Change Customers.
The Accounts Receivable ‘Delete and Change Customers’ panel has two separate tabs; #1 Delete and #2 Change. Both Window panes have a Starting Customer No. and Ending Customer No. The #2 Change has the additional field New Customer No. which needs to be an existing customer.
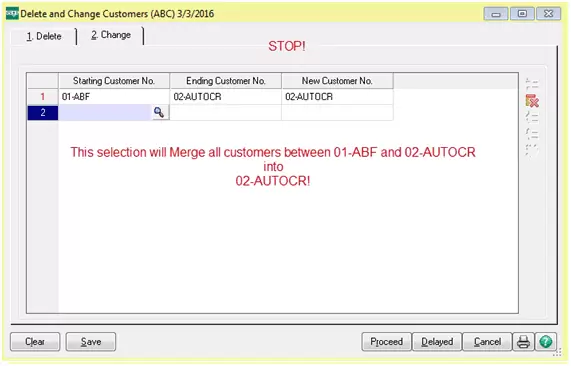
Note: The ‘Starting Customer No.’ – ‘Ending Customer No.’ is a range, and all customers between Starting Customer No. and Ending Customer No. will be merged into the New Customer No. Normally the Staring and Endng Customer should be the same customer number and not a range.
For example, I want to merge 01-ABF into 02-AUTOCR, but the selection below will merge all customers between account number 01-ABF and 02-AUTOCR into a single customer account 02-AUTOCR.
MAS 90 Version 3.71 (Non-Business Framework):
(Business Framework Modules Accounts Receivable- 4.10, Accounts Payable-4.20, Inventory-4.40)
Here are my recommended steps for using the Delete/Renumber/Merge utility:
- Verify you have a current system backup (on tape or other media).
- Create a backup within MAS 90/200. Use the File/Run- Program Name: SVDATA, and copy your live company data to another company code like BAK for all modules, or at least the module you are merging accounts in.
- Run each of the Delete, Renumber and Merge procedures separately. Do not combine the Delete, Renumber or Merge operations in the same batch or run.
- The Legacy Delete/Renumber/Merge utility does not have a report to run before starting the merge, so pay special attention to the Starting account an Ending Account columns before proceeding.
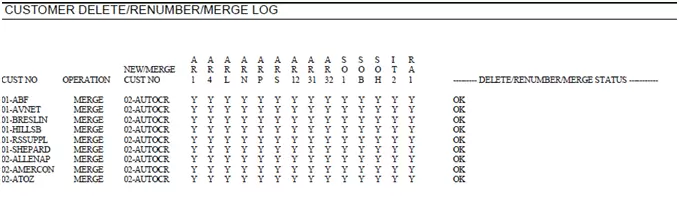
- Review the Customer Delete/Renumber/Merge LOG, and verify the results after the operation is completed by looking at your Account Master files.
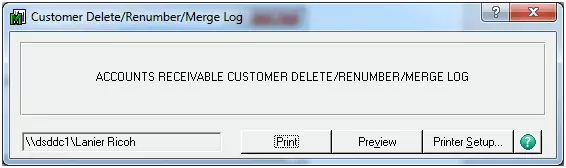
Here is a sample Delete/Renumber/Merge Log.
If the results are wrong, use SVDATA to copy BAK back to your live company code
Here is an example of the Accounts Receivable Merge – (Legacy modules):
The Delete/Renumber/Merge Utility data entry fields begin with the Starting Customer No. followed by the Ending Customer No. The next field, Change Method defaults to ‘Delete’. When ‘Merge’ is selected for the Change Method, an additional field is available called New/Merge Customer No. Clicking ‘OK’ places on the entry into the Delete/Renumber/Merge list to be executed.
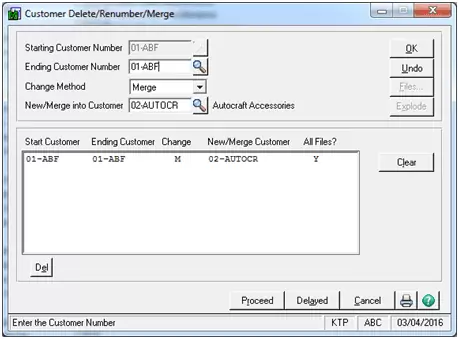
The common problem occurs when, after entering the Start Customer Number the Ending Customer Number is entered as the customer to merge into. But this is actually a Range of customers to merge!
Next the Change Method is changed to Merge and the additional field ‘New/Merge into Customer’ field is now available. Now you re-enter the Ending Customer Number as the Merge Customer and now you will merge a range of customers into the New/Merge Customer by mistake.
Normally the Start/End Customer No. should not be a range, so be sure to verify the Starting/Ending Customer numbers are correct.
Selecting a line and clicking ‘Undo’ removes the selection from the list. Selecting ‘Clear’ will remove all selections.
Review the online help for detailed field information and instructions on this feature.